General Questions
We currently primarily ship to the continental US and Canada. However, we have also shipped to over 15 other countries in Europe, Asia, Latin America and the Middle East. Some of these countries already have a shipping cost assigned at Checkout. Otherwise, contact us at [email protected] and we will provide you with a shipping estimate. The BlumSafe ships in two boxes and one of them (the safe itself) is heavy – over 60 pounds, so shipping internationally could cost several hundred dollars. But if you are willing to incur that cost, we would be happy to ship it to you.
To check shipping in the continental U.S. and Canada add the item(s) you want to your cart. In the “Shipping” box on the shopping cart page, click on “Calculate Shipping” and enter the state (or province for Canada) and zip code of the address you will be shipping to, and click “calculate”.
For orders outside the U.S. and Canada please contact us at [email protected], and we will provide a shipping quote.
We send status updates and tracking numbers via email. Usually, if you have not received your shipping email, it has been blocked by a spam blocking service or it may be in the junk email or Spam folder of your email box. If you have a spam blocker installed please make sure to allow emails from [email protected].
The status of your order can also be looked up online on our Order Status page.
Yes, products on the website are usually in stock and ready to ship from our warehouse in the continental United States. “Sold out” items are marked with an “Available by” date.
Orders are usually shipped out within 24 hours of receipt, except on weekends. All orders placed before 1 PM EST time will ship the same day, otherwise they will ship on the next business day.
We typically ship by UPS or FedEx, and your BlumSafe will usually arrive within 2-4 business days in the United States.
The BlumSafe comes with a two-year warranty. The Boxy® brand watch winders comes with a one year warranty that we will fulfill on your behalf. Contact [email protected] if there is any issue.
Basically, items can be returned or exchanged within 60 days of purchase. For more information, please refer to the Terms and Conditions page for our return/exchange policy.
Sorry, we do not accept checks or money orders. We currently accept Visa, Mastercard, Discover, American Express, Paypal and Amazon Pay. PayPal Credit is also available.
We currently do not ship to APO or FPO addresses.
This usually happens when a transaction is declined because of an incorrect address, cvv code, or expiration date. When a transaction is attempted, a temporary authorization may be placed on your card. This occurs when our payment processor (PayPal processes our credit card payments) is testing to confirm that your credit card account is active and has credit available to accommodate transactions.
This can happen with each attempt. If you were declined four times, you may see four temporary authorizations on your card.
There is no need to contact us about these temporary authorizations.
If your order was declined, this temporary transaction will be removed within 1-5 business days after it first appeared.
- If your order was not declined, this temporary transaction will become an actual transaction amount when the transaction settles.
- You should be aware that all temporary authorization charges will temporarily reduce the account’s available credit by the anticipated amount.
For more information, please contact your bank or credit card company about how temporary transactions work and affect you as a credit cardholder.
We are the designer and manufacturer of the BlumSafe. Yes, we are an Authorized Dealer for the Boxy® brand watch winder and related accessories.
Our international customers are responsible for paying any customs charges, VAT/IVA that their home countries may charge. In our experience, depending upon the country, some shipping companies charge it, some do not. We do not charge VAT/IVA/Sales Tax in the US on your international order.
Scroll to the bottom of https://blumsafe.com/product/blumsafe/#reviews
Blumsafe Questions
Yes, the power adapter for the BlumSafe is dual voltage, and automatically adapts to your home voltage, whether you are 120V AC in the US or 220-240V in most of the rest of the world. If your country uses a different plug than the “Type A” two blade setup used in the US, all you’ll need to do is to get an inexpensive plug adapter to match the pin setup used by your power outlet (for example, an adapter that convert the US two blade plug to the “Type C” two pin plugs used in most of continental Europe). We do not sell the plug adapter, but you can get it at any hardware store.
See our Support Page-User Manuals for the Installation and Operating Manual, and the Support Page-Videos for installation and lock programming videos.
Yes. Please see the instructions that came with your BlumSafe or find them under the Support tab — User Manuals on our website. You can also view the lock programming instruction video located under the Support tab — Videos, on our website.
No, your codes and fingerprints should be fine. BlumSafes are equipped with non-volatile memory, meaning that your data is retained even if the batteries in your safe run down. In that event, simply replace with fresh batteries.
AND REMEMBER TO ALWAYS STORE YOUR BLUMSAFE BACKUP KEYS OUTSIDE OF YOUR SAFE — YOU WILL NEED THEM TO GET INTO YOUR SAFE IF YOUR BATTERIES DIE!
No. The BlumSafe is not waterproof or fireproof. It is worth noting that almost all consumer “fireproof” safes do not protect their contents to a low enough temperature to protect the internals of your watches. However, because the BlumSafe is a wall safe, it benefits from some level of fire protection provided by the sheetrock of the walls.
In addition, we strongly urge you to consider the Samsung SmartThings multi-sensor package for your safe (separately available). The SmartThings multi-sensor can be programmed to provide a warning to your smartphone of rising temperature in the safe, possibly indicating a fire. It can also indicate the opening of the safe, attempted break-in, low battery, and broken internet connection.
Your safe is not fireproof or waterproof. Should your safe be exposed to fire or water, make sure to have your safe is opened as soon as possible. Remove all watches and immediately bring them in for service, in the event you have any concern about water resistance. If your safe included firearms, remove them and have them cleaned and lubricated as soon as possible. Do not continue to store items in a safe that has been compromised by water or fire. You should purchase a replacement model in either case. Our warranty does not protect against fire or water damage.
While BlumSafe provides a two-year warranty for the safe against defect as provided in Terms, BlumSafe does not insure your safe or the contents of your safe against loss or damage from fire, water, theft or other casualty or destruction. A homeowner’s policy or other insurance coverage should be purchased in an amount sufficient to cover the contents. Most homeowner’s policies require the purchase of riders or endorsements on items such as guns, watches, jewelry, coins, and other valuable collectibles. Should damage occur to your valuables, a claim should be made with your homeowner's insurance. Check with your local insurance company for possible discounts that may be available with your purchase of the BlumSafe.
Sixteen watches in total. The BlumSafe can accommodate up to twelve automatic watches on its twelve Boxy winders and has four watch cushion in the draw base for another four watches.
Choosing the right location for your BlumSafe is the most important part of the process. The BlumSafe can be mounted in either a cabinet, wall unit or in a wall between two 16” on-center studs (which is typical US construction). If you have interior wall space for a 16” by 30” painting, you have a place for the BlumSafe. The dimensions of the BlumSafe can be found here. The BlumSafe requires at least 7 ½” of wall-depth to be mounted flush, which can be accomplished in several ways, or it can be mounted partially flush in a 2”X4” wall, using molding or framing pieces underneath the face plate of the safe for a finished look. For more information on installation choices and ideas, visit this page or see our BlumSafe installation video. The safe has mounting holes for both the 8” and 4” stud options. If you are mounting the BlumSafe in a wall, there should be no wires, pipes or ducts running in the stud pocket where the safe is located, unless you just run power from an adjacent stud pocket to a point below the safe (i.e., a power outlet about 18” above floor level).
The short answer is yes, you could attach the BlumSafe to steel studs (you’d drill pilot holes into the studs for the mounting bolts to screw into). Even though steel studs are kind of flimsy outside the wall, they gain sufficient rigidity to hold the safe when attached to the sheetrock. That being said, a better idea would be to reinforce the steel studs with pieces of wood 2”X4”s for the safe to screw into (you could fit them into the “U” shape of the steel studs). If you can’t do that, then another idea would be to slip several 2X4’s into the wall cavity when you cut it, stand them on the floor vertically, leaning against the steel studs, and rest the safe on top of the ends of those 2X4s.
The power wire comes out of a hole at the bottom of the safe. It is meant to be plugged into a wall outlet, not hardwired. Generally, in the same stud cavity in which you would put the safe, you would open a small hole about 18” up from the floor, run the power wire through a wall plate like this one and then plug it into a power outlet on the wall (or on the wall behind the safe). See Figure 7 on this page or around the 7:30 mark on our BlumSafe Installation Video.
The BlumSafe is designed for in-wall or partially in-wall placement, but can also be mounted very nicely in wall units and cabinetry. See this page for various installation options.
New construction is the easiest way to get the most trouble-free installation. Basically, in an installation where you are using Sheetrock or drywall for the wall materials, you need at least 2”x8” studs (nominal), 16” on center, with at least 1/2” drywall, which provides more than the 7 1/2” of depth that the safe needs to sit flush on the wall. More information on installation can be found here. There should be no wires, pipes or ducts running in the stud pocket where the safe is, unless you just run power from an adjacent stud pocket to a point well below the safe (box for outlet about 18” above the floor). Or put your power in the adjacent stud pocket. The power adapter cable for the winders will come out the bottom of the safe and pop out of the wall above the floor to be plugged into the outlet.
If you have 18 minutes of your life to spare, see our full installation video for both the do-it-yourselfer and tradesman.
If you already have the wall space in which to place it, installation of a BlumSafe is fairly simple, and a carpenter, handyman, or do-it-yourselfer can easily install it within two hours. The most important part is choosing the right location for your safe.
If you feel better having a carpenter do the work for you, we recommend simply checking Angie’s List or HomeAdvisor. Here are links to share with them FIRST of useful installation notes and an installation video.
The AC adapter that comes with the safe runs the winders, the lock is run on batteries, with a key backup (DON’T KEEP YOUR KEY IN THE SAFE — it defeats the purpose!). Use good quality batteries and they will last at least two to three years. The indicator on the LCD screen and audio beep alert tells you when the battery runs low.
The keypad stands about 1.25” proud of the safe door surface. As a result, in this blog post, we recommend a 1.5” deep canvas for a concealing solution.
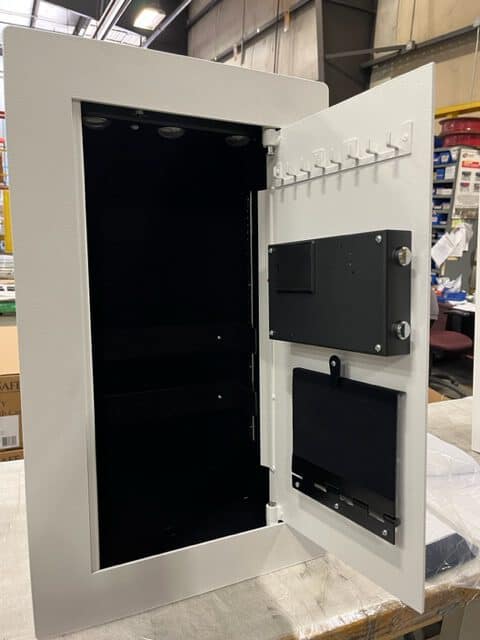
When you are facing the safe looking at it, the hinge is on the right side, so the door swings right. Unfortunately, the hinging cannot be switched to the other side.
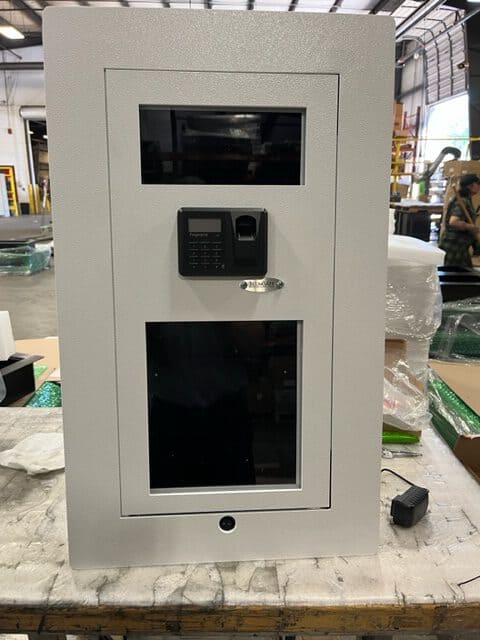
The Display Door is designed to be added to the BlumSafe at any time in about ten minutes (don’t believe me? Watch the Display Door installation video). The Display Door does not have to be added when the safe is installed in the wall. If you are not sure whether you want the Display Door, we suggest you just buy the regular BlumSafe and wait. There is no price advantage to buying the Display Door at the same time as the BlumSafe.
Keypad and Fingerprint Lock
See the instruction manual for your BlumSafe or the videos for programming the keypad and fingerprint sensor.
The keys you receive with your safe are meant as an emergency backup, just in case the batteries run out on your electronic lock (don’t worry – they last for years of normal use and there is a low battery indicator on the LCD screen and low battery audio beep alert) or there is another malfunction. They will open your safe but not lock it. And as an emergency backup to open your safe, your keys SHOULD NEVER BE STORED IN THE SAFE! They should be kept outside the safe someplace you will remember.
When we got our last batch of safes, the keypad manufacturer decided to changed the * to a #. Basically the keys are all in the same location as shown in the instructions, but the figures printed on that key and the lower right one changed. One other cautionary note — when programming, follow the instructions exactly.
AND REMEMBER TO ALWAYS STORE YOUR BLUMSAFE BACKUP KEYS OUTSIDE OF YOUR SAFE — YOU WILL NEED THEM TO GET INTO YOUR SAFE IF YOUR BATTERIES DIE!
Contact us at [email protected]. The likely reason is that the LCD is not powered, and this could be due to a loose connection that occurred during the shipping process. We can send you illustrated instructions for remedying this – don’t try it before talking with us first.
A couple of thoughts to help you get themost out of the fingerprint function (versus using the keypad or backup key):
- The fingerprint sensors on virtually all safes have much less computing power than the fingerprint sensor on your smartphone. Accordingly, any safe’s fingerprint sensor won’t read as well, and we must give the safe the best chance it can to get a good read, which usually works.
-This is even more of an issue as we get older, when our fingerprints get thinner, particularly from the 50’s onward. Accordingly, it is worthwhile to look at your fingers and determine where you have the “best” fingerprint – where the ridges are highest and clearest.
--You can register 32 fingerprints in the BlumSafe. To optimize the chances of getting a good read, register several different “views” of each of the fingers you think you want to use, first registering the finger straight onto the pad (not pressing too hard), then registering under several different “fingerprints” that same finger, first turned a bit to the right, then to the left, then tilted up a bit and lastly down a bit. If you register 5 fingers that way, you will have a much better chance of a good first-time read.
--Think about the likely angle you approach the safe and place the finger on the sensor when you naturally open the safe – “straight in” isn’t how we often put our finger on the reader. Register your finger the way you are likely to place it.
--Note that fingerprints are often almost impossible to read after stepping out of a shower, or having your hands in water for a while.
Watch Winder Questions
IMPORTANT NOTE: BEFORE PLACING YOUR WATCHES IN THE BLUMSAFE, CONSULT WITH YOUR WATCH’S OPERATING AND MAINTENANCE DIRECTIONS AND THE BOXY BRICK WINDER DIRECTIONS THAT CAME WITH YOUR BLUMSAFE AND ARE AVAILABLE HERE.
The watch winders that we carry should be used for automatic watches only. Other watches such as a kinetic, battery (quartz) operated, or manual watches should not be placed in an active watch winder but may be stored in the drawer or on a shelf in the BlumSafe.
All automatic watches have different TPD requirements, but on average most automatic watches need a minimum of 650-1200 TPD. The Boxy Brick winder provided with your BlumSafe accommodates this requirement.
To find the right setting for your watch we recommend the following procedure:
- Manually wind the watch by turning the crown 20-30 times. The watch winder will not wind a completely dead watch.
- Set the winder to the lowest TPD setting and bi-directional rotation. Place the watch in the winder and make sure it is seated properly and securely in the holder.
. Turn the winder on and periodically check to make sure the time is correct. Most automatics have a maximum of 40 hours of power reserve when fully wound so if the time is correct after 2 full days, this is the proper setting for your watch.If the time is incorrect, please set it to the next highest TPD setting and try again.
- If the time is incorrect, please set it to clockwise only and try again.
- If the time is incorrect, please set it to counter-clockwise only and try again.
- If the watch works while it is being worn but does not work in the winder, it may need to be serviced. When a watch is worn, the movements it experiences are not as smooth as in a watch winder, so while a watch may work when it’s worn it may not work when in the winder. Watch winders move very smoothly so if the lubrication inside the watch has congealed from not being in use, the watch may need to be serviced.
Below is a list of popular watch brands and the common settings for most of their watches. Specific models from some brands may have exceptions and may not work on the setting listed below. If this is the case please contact the watch manufacturer to determine the correct setting for your particular model.
BD=Bi-Directional, CW=Clockwise, CCW=Counter Clockwise
See our Support — User Manuals page for an electronic copy of the Boxy brick winder directions.
We recommend leaving the watch in the winder at all times when it is not in use.
The Boxy brick winders are nearly silent because they are usually used outside of a safe. They use high quality, long-lasting, silent Mabuchi motors with a belt drive system — you definitely will not hear them with the BlumSafe door closed.
Yes, you can purchase an optional battery pack on our site to power the BlumSafe’s winders with 4 “D” cell batteries (not included). This battery pack will last approximately 4 months for a three winder installation before the batteries need to be changed. Accordingly, we strongly urge that you not use the battery pack option with more than three winders operating at any one time, and consider the possibility that in the future you may add more winders to your BlumSafe.
Yes, you may use the Boxy winders outside of the BlumSafe. Each winder has a power connector port on the back, and multiple winders can be stacked up to three high to use that power. You can purchase a power adapter from us here to power your winders outside the BlumSafe and you can also buy a powered winder tray here.
This issue could result from several problems, most likely a slipped belt. First, does the winder cup move around freely with no resistance? If so, the rubber belt that drives the rotor may have slipped or broken. See this video for directions on replacing the belt. It is likely that your existing belt is still good and just slipped off the pulleys and is loose in the winder enclosure. If it is torn, contact us and we will mail you a new belt. If your belt is in place and functional, then you may have another problem to troubleshoot. So then, try this: With the power off, put your hand in the winder cup and GENTLY push it inward and turn it a bit clockwise and then counterclockwise. Then put it back in the safe and try it and see if it works. Also, try moving both control switches on the face of the winder (the speed and the direction sliders) to all positions to see if this fixes it – sometimes it does because the switch position is in the middle of two settings.
This problem usually results in the winders not getting a complete electrical connection when stacked. Our winders pass electricity from one to the next by the metal electrical contact pads in the nubs underneath each winder. If there is a piece of packing paper, foam or other foreign substance blocking any of those four contact pads from getting or relaying electricity, your winder will not work. So in a column of winders where one or more winders does not seem to be powered, check all contact pads carefully for foreign substances. Next, make sure each winder in the column is stacked completely seated in the cavity of the winder (or drawer box) beneath it. The most likely cause of problem is that when you inserted a winder with Velcro on the back, that it caught the Velcro strip on the wall on the back of the safe before allowing the winder electrical contacts to seat properly. Pull that winder out carefully, and then reinsert it slowly, sliding it from the front straight inward, sitting directly on top of the winder below it with the electrical contact nubs lined up. Lean the lower winder out toward you a fraction of an inch while doing this, and seat the electrical contact nubs of the top winder in the cavities in the bottom winder BEFORE making contact with the back wall Velcro.Then just push and lock in the Velcro. This will allow you to have a good electrical connection.
Absolutely. It was designed to run twelve winders.
The safe includes two velvet-lined shelves and eight shelf support brackets. As you point out, since the winders are modular, stacking like Legos, you can add winders as you need them.